Once you have accessed the Paye.net option you will be presented with the Payment Entry - Accounts screen as shown below. This is where you will be able to enter transaction details. Click on any field for a further explanation of the functions.
Once all the Payment Details for the Transaction have been entered, click the Payments button to continue
|
Navigation
(This option is not available on all screens) |
If you have access to multiple sites then the Site for which the payment is to be processed must be selected from the drop down box. A default site may have been defined for you.
If you are operating only on a single site then this field will be greyed-out which cannot be changed.
The most common type of transaction you will enter into Paye.net is a simple Single Account Transaction with a Single Payment Method.
Other transactions are also available
- Single Account Transaction with Multiple Payment Method
- Multiple Account Transaction with Single Payment Method
- Multiple Account Transaction with Multiple Payment Method
From the drop down box, select the fund which you want to use.
The fund code is set by your Administrator. These codes can consist of up to five alphanumeric characters.
Depending on your user access, you may not be able to see all the funds available on the site. These are set by user groups by the Administrator.
Type the Customer’s Account number or reference and press TAB to confirm and move on to the next field.
The SEARCH option above is also available to lookup information relating to the fund. See HERE for examples.
Balance details may appear at this stage if the customer has an account, the name and address details will automatically become populated. The address details will be printed on the receipts if specified in account entry. Warning messages may also be displayed.
|
Account Validation The account reference numbers may require specific data to be entered. There are different validation methods used. For a detailed explanation on the types of validation, see HERE |
Enter the transaction amount and confirm it by pressing TAB.
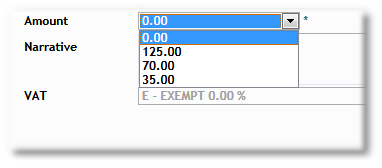
If a fund is setup as a Notice in IM, multiple amounts can be entered (in IM) and be available in a drop down list. This means only fixed amounts can be selected. Fixed amounts usually apply to funds like Parking Fines.

an example of a fixed amount selection
A Negative Amount can also be entered.
Within Paye.net you are able to accept negative transactions. You can also restrict some users from taking negative transactions, the same as you would in ACR.
To take a negative transaction, you would complete the fields, Fund, Reference and Narrative as you would in an ordinary transaction, except in the Amount field you would enter a minus sign in front of the amount. Eg -20.00.
Once you press the Payments button, the system recognises the amount as negative and a pop up message will appear to confirm if you want to proceed with the Negative Transaction.
If Yes, you will then be taken to the Payment Entry - Accounts Screen, were you will be able to complete the Negative Transaction Payment Details. You will notice that in the Tendered Field the amount will be a negative.
A negative will put money back onto the customer's card.
|
Negative transactions are not the same as refunds since refunds are linked to the original transaction. whereas negative transactions are processed stand-alone.
There are additional group level security settings to allow only specific users to process negative transactions. These settings are separate to the security settings for refunds |
Narratives are extra notes added to the transaction. This will be displayed in the Narrative / Pay Ref field in the Transaction Summary. Enter relevant Narrative (if required) and confirm by pressing TAB
Predefined narratives (set by your systems administrator) can be selected using the magnifying glass search icon.
If the fund has a VAT code, the VAT will become populated by the system. It may however be possible or necessary to manually enter a VAT code or select the required VAT code from the drop down list.
Some ledger items can have additional information added to the transaction. This is setup within Income Management and can be set as being mandatory entries or not.
Customers' names and addresses are all stored in a secure database. Occasionally, a customer will want to pay a bill but does not have the documentation to hand. By entering key information in the Get Address field, you will be able to retrieve information stored on the database in order to populate the Accounts screen.
You can view and delete current schedules that currently exist. See here for further information.
This option is available when you have CallSecure installed. You can then search specific CallSecure customers
|
Please note: Some functions, menus or views may not be available to you. This is dependent on your user privileges and job role set by your Administrator |
Depending on the set-up of your system and the fund (for example Council Tax) selected for payment, the customer's name and address may be displayed.
In other circumstances you make be required to enter the name and address as part of the transaction, for example when supplying a miscellaneous service.
|
Printed and email receipts of multiple account transactions will be combined and only one receipt to one recipient produced |
Depending on the type of transaction, and if the customer is paying at the cashier, you can select not to print the address on the receipt.
This option defaults to YES. See HERE for further information on Receipts.
Stop Messages are programmed and maintained in AIM Axis Income Management.
When you enter an Account reference, the balance details may be brought into payment entry and you could receive a Warning / Stop Message if one is linked to the account.
There are different circumstances where you can get Stop Messages, which also have different behaviours depending on how the messages are programmed.
Displays the message on the Payment screen and allows you to continue with the transaction. e.g. "Do not accept Cheques"
|
A message popup which appears, but still allows certain users to continue with a payment.
e.g. "Account suspended due to previous underpayment. Call Supervisor"
|
Creates a popup message and does not allow you to complete the transaction. No users will be able to accept any payments until the Account is changed.
|
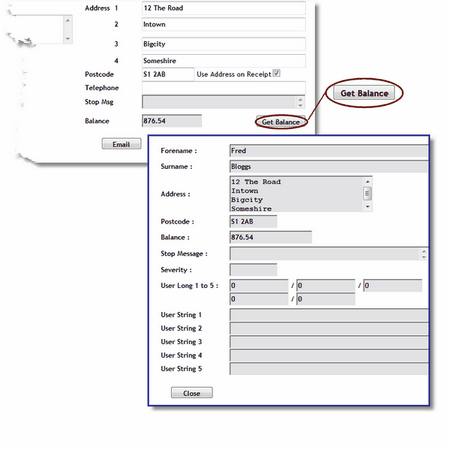
Basic balance details may be displayed on the screen when a customer’s reference number is entered. Depending on the fund, you may see the Customer's Name, Address and current Balance.
The fields are only populated if the Reference and Fund fields uniquely identify the customer (e.g. by entering an account reference off a bill, or an ID number off a Card) and balance lookups are configured for that fund.
To view further Account Details for the customer, click on the Get Balance button and a popup screen will be displayed.

Selecting this option will navigate you to the Payments screen
This option is used when you are paying for more than one account. After you have entered the transaction information (fund, amount etc), press the ADD button. A summary of the transaction will be saved and displayed on the bottom of the screen.
To add another account transaction, simply enter the details and press ADD again.
Once all transactions have been added, continue to the Payments screen.
Continuous Payments are used when you want to continue making the same payment without an end date (eg monthly tutoring lessons)
A Planned Schedule is used when a total amount is available and instalments wants to be made (eg. Annual Council Tax bill)
An email address can be entered so that a receipt for the payment can be electronically sent to the customer.
If an email address has been entered on the Accounts screen, it will be populated in this field. You can still amend the email address if required.
|
Printed and email receipts of multiple account transactions will be combined and only one receipt to one recipient produced |
You can cancel the current transaction at any time. A confirmation message will display when you click the CANCEL button. This does not affect any transactions added to the summary on the bottom of the screen.
A list of all current transactions not paid for will be displayed on the bottom of the screen.
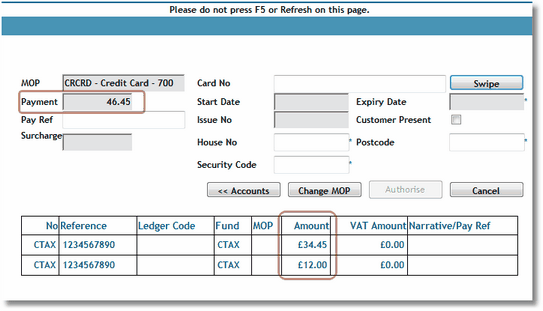
When you proceed to the Payments screen, the total of all the transactions will be added up and displayed on the Payment field (see image below)

The total of all the transactions in the grid is displayed in the Payment field. This can be edited if you are paying with more than one Method of Payment (eg, £10 cash and the remaining £36.45 by card)
Click the Copy icon to create a copy of the transaction, where everything of the transaction will be copied except the amount. This is so that different amounts can be entered for the same account if needed..
Click the EDIT icon to amend any information of the transaction. Once you have changed information on the transaction, click the UPDATE button.
To delete any transaction, click the DELETE icon to delete that transaction from the Transaction Summary grid.
By press the Delete All button, All the transactions in the grid will be deleted. Select YES to the pop-up screen requesting you to confirm.